
🪄 AI Summary
Heading 1
Heading 2
Heading 3
Heading 4
Heading 5
Heading 6
Lorem ipsum dolor sit amet, consectetur adipiscing elit, sed do eiusmod tempor incididunt ut labore et dolore magna aliqua. Ut enim ad minim veniam, quis nostrud exercitation ullamco laboris nisi ut aliquip ex ea commodo consequat. Duis aute irure dolor in reprehenderit in voluptate velit esse cillum dolore eu fugiat nulla pariatur.
Block quote
Ordered list
- Item 1
- Item 2
- Item 3
Unordered list
- Item A
- Item B
- Item C
Bold text
Emphasis
Superscript
Subscript
Scaling video is where most B2B teams leak quality without realising it. A webinar recording that looked sharp at 1080p turns blocky at 4K. A product demo repurposed for LinkedIn arrives soft and pixelated. If you're a SaaS founder or marketing lead pushing video across multiple channels, the problem isn't production budget, it's workflow. These tips for scaling video without losing quality in 2026 give you the technical foundation and practical decisions that keep every frame sharp, whether you're upscaling old assets or building a fresh short-form video pipeline from scratch.
TL;DR
- Codec choice determines quality ceiling: use H.265 HEVC for broad compatibility, AV1 for maximum efficiency on modern platforms.
- AI upscaling (Topaz Video AI, Upscayl) adds genuine detail, traditional bicubic interpolation only blurs.
- Source quality is the hard constraint: 1080p to 4K scales cleanly; below 480p to 4K produces hallucinated artifacts.
- Export once from a lossless master, then produce platform-specific derivatives, never re-compress a compressed file.
How to Scale Video Without Losing Quality
Scaling video quality is a systems problem, not a one-click fix. The decisions you make before you touch an export dialog define everything downstream. The single most important principle: always work from the highest-quality source you have. Always export your master file at the highest quality, then create platform-specific versions, never compress a compressed file, always start from the master.
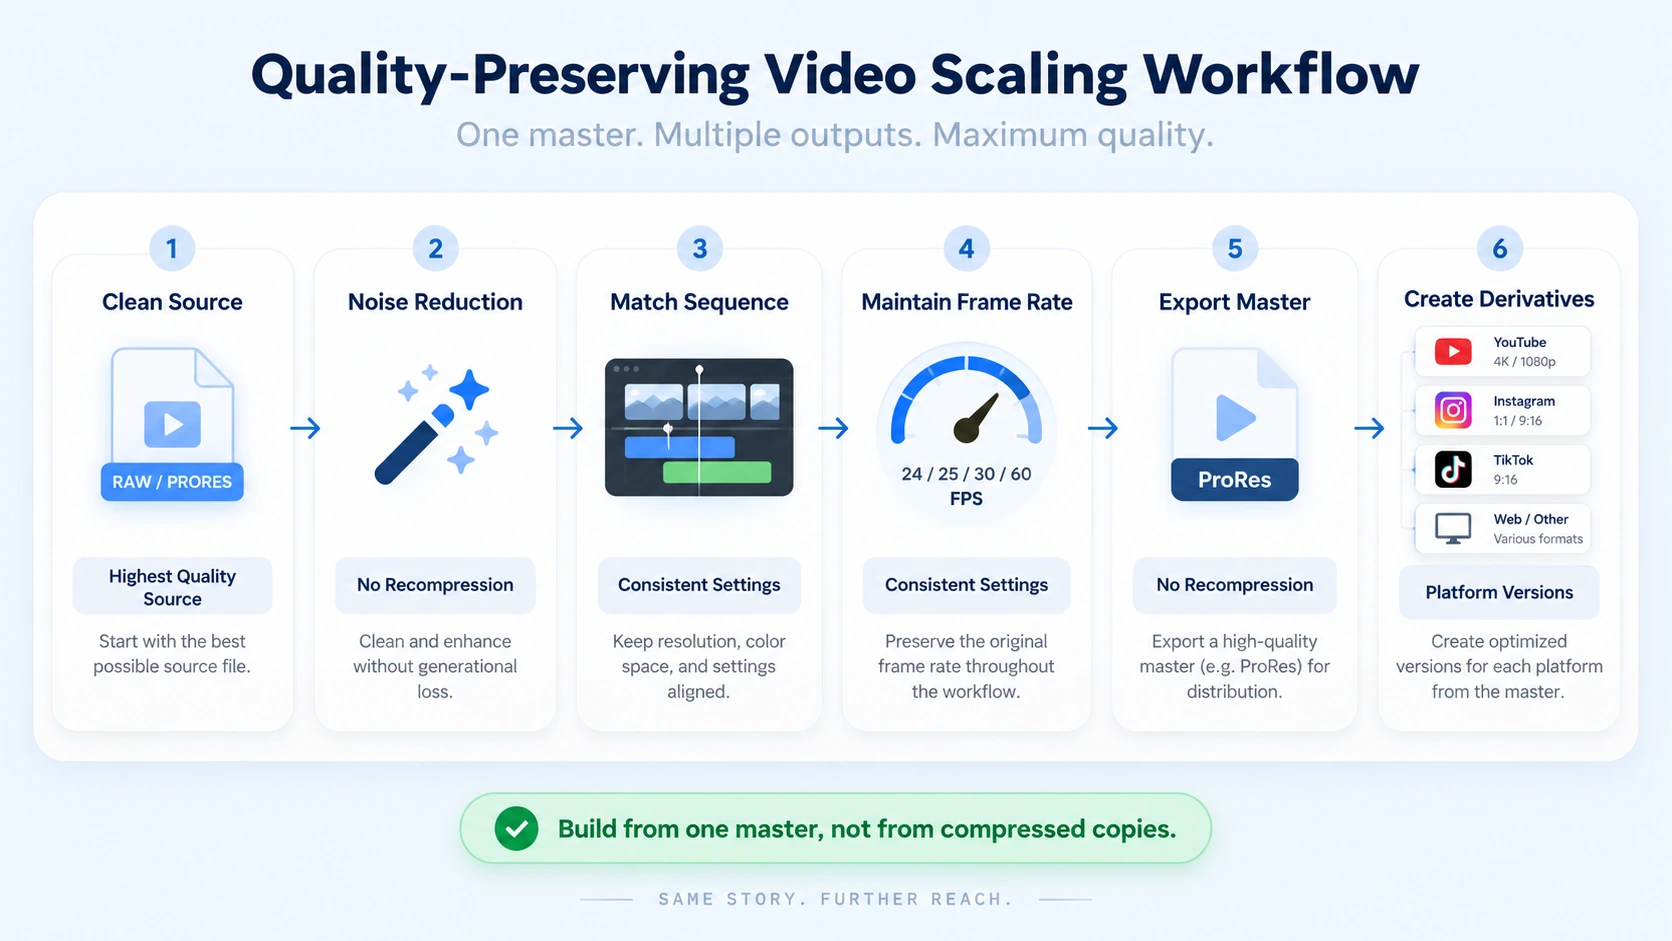
This applies whether you're repurposing a founder podcast into LinkedIn clips or turning a recorded demo into a YouTube explainer.
Start with a clean source file. Noise, compression artifacts, and low pixel density in your source will be amplified when you scale up. Before upscaling or exporting, apply noise reduction inside Adobe Premiere Pro or DaVinci Resolve to remove digital grain that resampling algorithms can misread as real detail.
Match your sequence settings to your output target. In Adobe Premiere Pro, set your sequence resolution to the final delivery resolution, not to the source resolution, before you begin editing. In DaVinci Resolve, use the timeline resolution setting in Project Settings to match your export target. Mismatched sequence and export resolutions force the NLE to apply an on-the-fly resampling pass that degrades quality.
Maintain frame rate consistency throughout. Mixing 24 fps source clips into a 30 fps sequence causes pulldown artifacts. Most consumer cameras output Variable Frame Rate with micro-jitter; forcing CFR triggers frame duplication or dropping, introducing visible stutter. Use "Same as Source" unless you've verified CFR with ffprobe.
Use a transcoding pipeline for batch work. FFmpeg handles batch transcoding, frame rate normalisation, and resolution changes inside a single command, making it the backbone of any serious scaling workflow:
```
ffmpeg -i input.mp4 -c:v libx265 -crf 20 -preset medium -vf scale=3840:2160 output_4k.mp4
```
Three steps to build a clean scaling workflow:
- Audit your source files for resolution, bitrate, and frame rate using ffprobe.
- Denoise and colour-correct inside Premiere Pro or DaVinci Resolve before any upscaling pass.
- Export a lossless or near-lossless master (ProRes or DNxHD), then derive all distribution versions from that master.
Best Ways to Upscale Video Quality in 2026
Traditional upscaling stretches pixels. Bicubic interpolation just stretches pixels, making everything blurry. AI upscaling is categorically different. An AI video upscaler uses machine learning models to increase resolution and improve visual quality. It does more than stretch pixels, it predicts missing detail based on patterns learned from large datasets. The best ways to upscale video quality in 2026 break down by use case:
For pure quality on hard restoration work, Topaz Video AI is still the leader in 2026, especially with the Starlight series for old or damaged footage. But it's no longer the obvious default, the October 2025 switch to $299/year subscription pricing changed the math, and for modern footage (1080p+ source, mainstream output), tools like Upscayl, HitPaw, and AVCLabs deliver 80–90% of the quality at a fraction of the cost. Know your source quality ceiling before you choose a tool.
The honest rule for all AI upscaling: at some point, more lift equals worse output. 1080p to 4K is generally safe. 720p to 4K is borderline. Anything below 480p going to 4K is hallucination, period. For B2B teams turning recorded webinars and demos into short-form clips, the realistic target is 1080p to 4K, safe territory where AI models produce genuinely sharp results. Check out Komet Media's full-service video production and short-form video editing services if you need a team to handle this pipeline end to end from initial shoot to final edit.
Codec Optimisation: H.265 HEVC vs AV1 in 2026
Codec choice is the most underrated tip for scaling video without losing quality in 2026 decision in any production workflow. The codec determines file size, playback compatibility, and how much visible quality survives distribution compression.
AV1 vs H.265 is no longer a simple choice between a new codec and a mature one. In 2026, both can deliver high-quality video at low bitrates. AV1 usually provides better compression efficiency and smaller file sizes at the same quality. H.265, also called HEVC, remains attractive when an app depends on established hardware, broadcast equipment, or an existing HEVC workflow.
AV1 delivers 30–50% better compression than H.265 at the same quality level and costs nothing to license. H.265 encodes faster, runs on a much broader base of hardware, and supports Dolby Vision, but comes with fragmented patent licensing that adds real cost and legal complexity. Here's how to choose:
For bitrate management in HandBrake: for most users in 2026, H.265 (x265), Constant Quality RF 20–22, and a built-in preset like "HQ 1080p30" give the best balance between quality and compression. RF (Constant Quality) controls quality, not file size.
CRF 20 works well for 1080p; CRF 18 is appropriate for 4K, these produce excellent quality with reasonable file sizes. In FFmpeg, the equivalent flag is -crf 20 paired with -preset medium for the right balance of encode speed and quality.
Key principle: Never upscale to 4K and then encode at a low bitrate. The upscaling pass adds detail; the codec pass must preserve it. Use CRF 18–20 for any 4K output.
Export Settings That Preserve Quality Across Platforms
Getting tips for scaling video without losing quality in 2026 right at the export stage is where most teams give back all the quality gained in editing. MP4 with H.264 video codec and AAC audio is the most universally accepted format across Facebook, Instagram, TikTok, YouTube, LinkedIn, and Snapchat, it delivers reliable compatibility and clean transcoding results on every major platform. Platform-specific aspect ratio and resolution targets in 2026:
As best practice, create two master video files, one in a 9:16 aspect ratio for vertical platforms and the other in a 16:9 aspect ratio for horizontal platforms. For aspect ratio preservation when scaling, use FFmpeg's scale filter with -1 to preserve the source ratio automatically:
```
ffmpeg -i input.mp4 -vf scale=1920:-1 output.mp4
```
Every major platform from Facebook and Instagram to TikTok, YouTube, LinkedIn, and Snapchat enforces these specs automatically. Upload a video that mismatches even one parameter and you risk silent penalties: lower reach, automatic cropping, or compression artifacts that make your work look amateurish.
Komet Media builds entire video marketing workflows around this principle, handling everything from video production from scratch to platform-native derivatives derived from a single high-quality master.
Why Videos Look Blurry After Scaling (And How to Fix It)
This is one of the most common complaints on B2B video teams: the file looked sharp in the editor, but blurry after upload. There are four root causes.
1. Re-compression by the platform. YouTube, LinkedIn, and Instagram all re-encode your upload. If your export bitrate was already low, the second compression pass destroys quality. Fix: export at a higher bitrate than the platform minimum.
2. Wrong resampling algorithm. When software scales video and uses a low-quality resampling algorithm (nearest-neighbour or basic bilinear), edges become soft. DaVinci Resolve and Adobe Premiere Pro default to better algorithms (Lanczos, bicubic), but verify this in your project settings.
3. Aspect ratio mismatch causing letterbox or stretch. If your sequence is 16:9 and your export target is 9:16, an incorrect aspect ratio preservation setting will squash or stretch the frame, and the resulting pixel density drop reads as blur.
4. Upscaling from too-low a source. Anything below 480p going to 4K is hallucination, period. Even the best AI video upscaling software can't put back information the source never had, knowing which side of the line your source sits on.
Fixes in practice:
- In Premiere Pro, set export bit rate to at least 16 Mbps for 1080p and 35–45 Mbps for 4K.
- In DaVinci Resolve, check "Use optimized media" and confirm your scaling filter in Project Settings is set to Lanczos.
- Run a test export on a 10-second clip before committing to a full render. Upload 10–30 seconds of your worst footage to any upscaling tool and judge the results yourself before processing entire projects.
- Always deliver from the lossless master, not from a previously distributed copy.
If you're repurposing podcast recordings or webinar content into short clips, this master-first approach is non-negotiable for maintaining quality at scale.
Building a Scalable Video Production Pipeline for B2B Teams
The earlier tips cover individual technical decisions. This section covers the system that connects them, the transcoding pipeline that lets you scale video content without losing quality across dozens of assets per month.
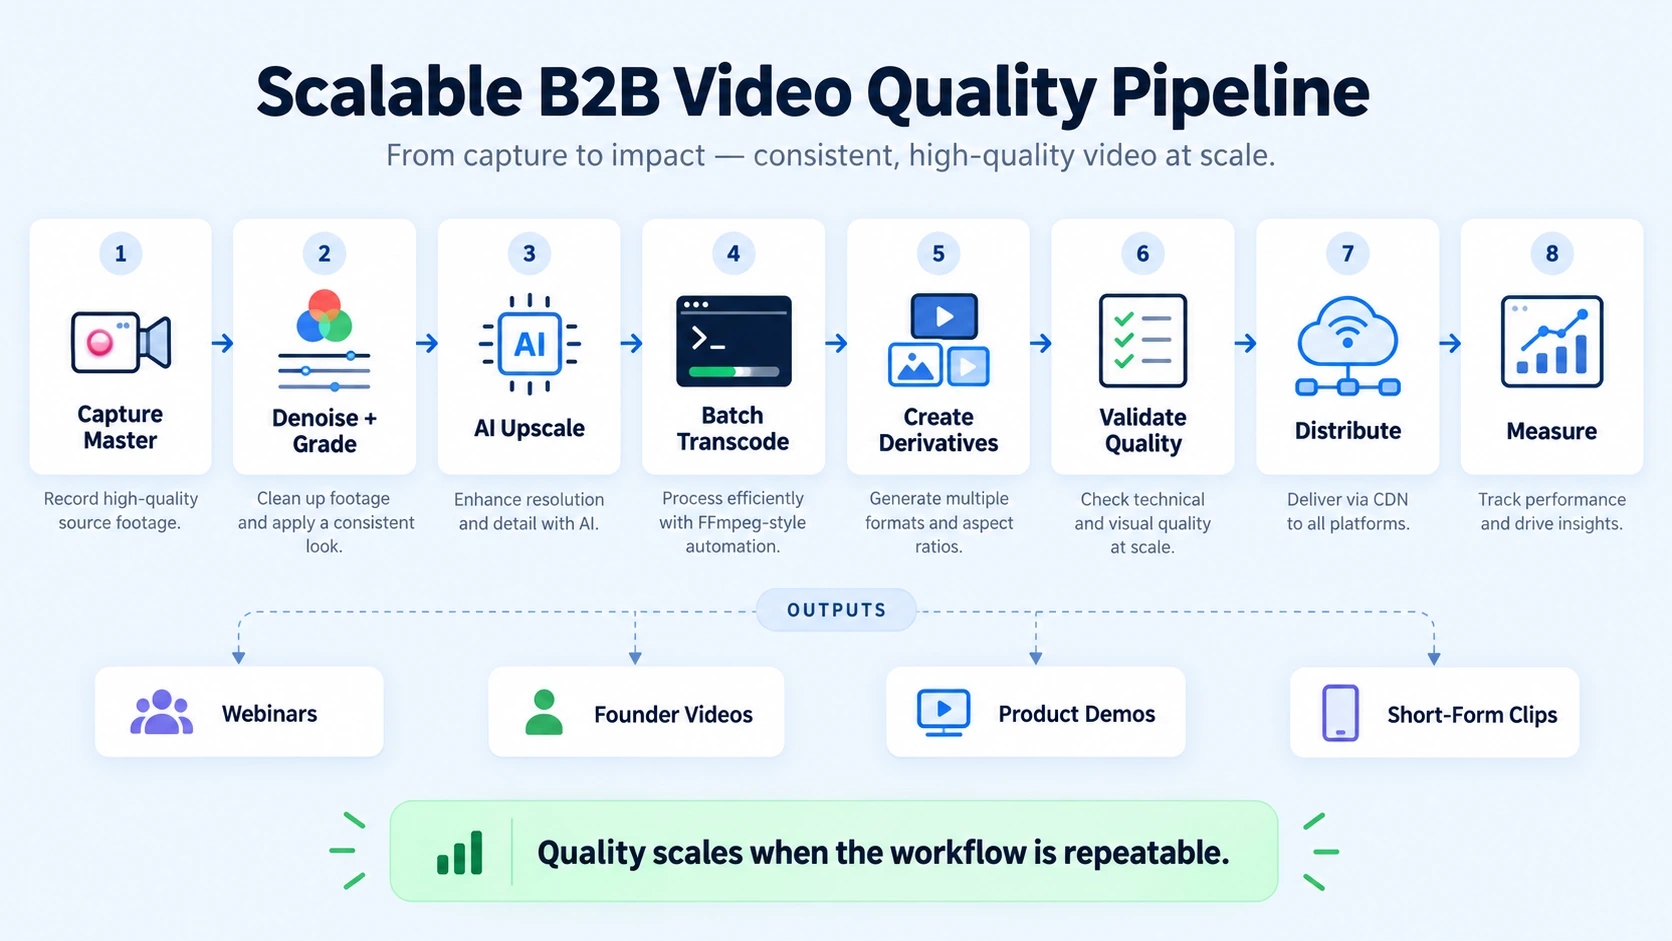
Most B2B SaaS teams hit a quality ceiling not because they lack the right tools, but because they lack a repeatable process. Here's the pipeline architecture that resolves this:
- Capture a lossless or near-lossless master at the highest available resolution (ProRes 422 HQ or DNxHD 185x for recorded sessions).
- Denoise and colour-grade once inside DaVinci Resolve or Premiere Pro, all derivatives inherit this work.
- Run AI upscaling (Topaz Video AI or Upscayl) on any source below 1080p before it enters the distribution pipeline.
- Batch-transcodes with FFmpeg to produce platform derivatives: 1080p H.264 for universal fallback, 4K H.265 for YouTube, and 9:16 crops for short-form.
- Validate with a CDN-aware quality check before distribution, confirm bitrate, codec, and aspect ratio match the target platform's current specs.
- Distributed via a Content Delivery Network with adaptive bitrate streaming to ensure pixel density and frame rate consistency across viewer connection speeds.
As we look toward 2026, the winners will be platforms that integrate upscaling into comprehensive video optimisation pipelines. For B2B teams, that means the pipeline above isn't optional overhead, it's the mechanism by which a single recorded webinar becomes ten high-quality short-form assets without quality decay at each step.
Teams running this pipeline through Komet Media's end-to-end video production and editing services avoid the manual quality-check bottleneck entirely. The system is built, validated, and repeatable from day one.
The compounding advantage: A clean pipeline means every new content piece, founder interview, product demo, conference talk, feeds the same machine and exits as platform-ready assets. Quality doesn't degrade with volume; it scales with it. This is the operational difference between a team that publishes occasionally and a team that builds consistent video presence as a pipeline asset for pipeline generation.
Conclusion
These tips for scaling video without losing quality in 2026 come down to three decisions made early: source quality, codec choice, and export discipline.
- Work exclusively from lossless or near-lossless masters, never re-compress a distributed file.
- Choose H.265 HEVC for broad compatibility or AV1 for maximum CDN efficiency; avoid H.264 for anything above 1080p where quality matters.
- Use AI upscaling (Topaz Video AI, Upscayl) for sub-1080p sources, 1080p to 4K is safe, below 480p is not.
- Build a batch FFmpeg transcoding pipeline so platform-specific derivatives are produced consistently at scale.
If you want a video system that handles this end-to-end, from concept and production to post-processing, Komet Media's B2B video production and growth services are built exactly for this.
Frequently Asked Questions
Q1: What is AI video upscaling and how does it work?
AI video upscaling uses trained neural networks to predict and reconstruct missing pixel detail when increasing resolution. Unlike bicubic or bilinear interpolation, which simply averages surrounding pixels, AI models like those in Topaz Video AI analyse scene context to generate realistic texture and edge detail.
Q2: What is the difference between video upscaling and video enhancement?
Upscaling increases the output resolution, for example, 1080p to 4K. Enhancement is a broader term covering noise reduction, colour correction, sharpening, and frame interpolation without necessarily changing resolution. The best AI tools in 2026, such as Topaz Video AI and Upscayl, bundle both into a single export pass.
Q3: How do I scale 1080p video to 4K without quality loss?
Use AI upscaling (Topaz Video AI, Upscayl, or Premiere Pro's AI upscale feature) rather than a simple resolution change. Export from a clean 1080p master, apply noise reduction first, then upscale. Encode the 4K output at CRF 18 with H.265 to preserve the added detail.
Q4: What export settings should I use to scale video without degrading quality?
For most users in 2026, H.265 (x265), Constant Quality RF 20–22, and a built-in preset like "HQ 1080p30" give the best balance between quality and compression. For 4K delivery, use CRF 18. Always export from the original master, not a previously compressed distribution file.
Q5: Why does my video look blurry after I upload it to LinkedIn or YouTube?
Both platforms re-encode your upload. If your export bitrate is too low, the second compression pass amplifies every existing quality loss. Export 1080p content at 16+ Mbps and 4K content at 35–45 Mbps. Upload a video that mismatches even one platform parameter and you risk silent penalties: lower reach, automatic cropping, or compression artifacts.
Q6: How do I upscale old videos to HD using AI tools in 2026?
Start by auditing your source, 1080p to 4K is generally safe; 720p to 4K is borderline. For anything below 720p, run a denoising pass first in DaVinci Resolve, then process through Topaz Video AI's Starlight model for heavily compressed or archival footage. Export the upscaled result as a new lossless master before any platform-specific distribution encoding.